Lesson 2: Transformations and Timers
- Summary
- *
- Text version
- *
- Exercises
- *
- Download source
Transformations
Our last program was kind of lame. Aren't we supposed to be doing 3D programming? It looked pretty 2D. Let's make things a bit more interesting. We'll make the shapes rotate in 3D.
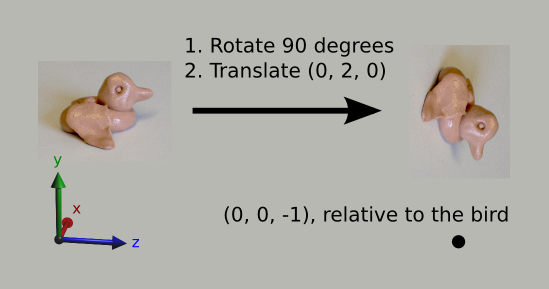
To do this, we'll have to understand a little about transformations in OpenGL. To think of them, imagine a bird flying around the scene. It starts out at the origin, facing the negative z direction. The bird can move, rotate, and even grow or shrink. Whenever we specify points to OpenGL using glVertex, OpenGL interprets them relative to our bird. So, if we shrink the bird by a factor of 2 and then move it 2 units to the right, from its perspective, then the point (0, 4, 0) relative to the bird is actually at (1, 2, 0). If instead, we rotate the bird 90 degrees about the x-axis and move it 2 units up, the point (0, 0, -1) relative to the bird is (0, -1, -2) in world coordinates. This is shown in the below picture, with my bird that I made out of silly putty. Note that to see it better, we're viewing the scene from the side.
At this point, you may be thinking, "This is stupid. Why don't we just specify all of the points directly?" Just hang on. This will become clear later in the course of this lesson.
We're going to start with the code from the last lesson, with some of the comments removed. First of all, instead of using -5 for the z coordinates of all of the points, let's just translate our bird 5 units forward, and then use 0 for their z coordinates. We translate by using a call to glTranslatef, with the amount that we want to translate in the x, y, and z directions.
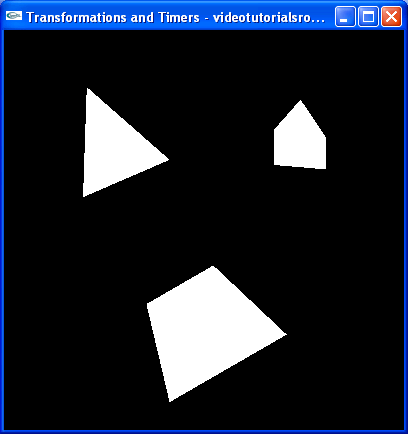
    glLoadIdentity(); //Reset the drawing perspective
    glTranslatef(0.0f, 0.0f, -5.0f); //Move forward 5 units

    glBegin(GL_QUADS);

    //Trapezoid
    glVertex3f(-0.7f, -1.5f, 0.0f);
    glVertex3f(0.7f, -1.5f, 0.0f);
    glVertex3f(0.4f, -0.5f, 0.0f);
    glVertex3f(-0.4f, -0.5f, 0.0f);

    glEnd();

    glBegin(GL_TRIANGLES);

    //Pentagon
    glVertex3f(0.5f, 0.5f, 0.0f);
    glVertex3f(1.5f, 0.5f, 0.0f);
    glVertex3f(0.5f, 1.0f, 0.0f);

    glVertex3f(0.5f, 1.0f, 0.0f);
    glVertex3f(1.5f, 0.5f, 0.0f);
    glVertex3f(1.5f, 1.0f, 0.0f);

    glVertex3f(0.5f, 1.0f, 0.0f);
    glVertex3f(1.5f, 1.0f, 0.0f);
    glVertex3f(1.0f, 1.5f, 0.0f);

    //Triangle
    glVertex3f(-0.5f, 0.5f, 0.0f);
    glVertex3f(-1.0f, 1.5f, 0.0f);
    glVertex3f(-1.5f, 0.5f, 0.0f);

    glEnd();
If we compile and run the program with these changes, it works the same, which is what we want.
I'd glossed over the meaning of the call to glLoadIdentity() in the last lesson. What it does is it resets our bird, so that it is at the origin and is facing in the negative z direction.
Now let's use some more translating, so that whenever we specify points for a shape, they are relative to the shape's center.
    glLoadIdentity(); //Reset the drawing perspective
    glTranslatef(0.0f, 0.0f, -5.0f); //Move forward 5 units

    glPushMatrix(); //Save the transformations performed thus far
    glTranslatef(0.0f, -1.0f, 0.0f); //Move to the center of the trapezoid

    glBegin(GL_QUADS);

    //Trapezoid
    glVertex3f(-0.7f, -0.5f, 0.0f);
    glVertex3f(0.7f, -0.5f, 0.0f);
    glVertex3f(0.4f, 0.5f, 0.0f);
    glVertex3f(-0.4f, 0.5f, 0.0f);

    glEnd();

    glPopMatrix(); //Undo the move to the center of the trapezoid
    glPushMatrix(); //Save the current state of transformations
    glTranslatef(1.0f, 1.0f, 0.0f); //Move to the center of the pentagon

    glBegin(GL_TRIANGLES);

    //Pentagon
    glVertex3f(-0.5f, -0.5f, 0.0f);
    glVertex3f(0.5f, -0.5f, 0.0f);
    glVertex3f(-0.5f, 0.0f, 0.0f);

    glVertex3f(-0.5f, 0.0f, 0.0f);
    glVertex3f(0.5f, -0.5f, 0.0f);
    glVertex3f(0.5f, 0.0f, 0.0f);

    glVertex3f(-0.5f, 0.0f, 0.0f);
    glVertex3f(0.5f, 0.0f, 0.0f);
    glVertex3f(0.0f, 0.5f, 0.0f);

    glEnd();

    glPopMatrix(); //Undo the move to the center of the pentagon
    glPushMatrix(); //Save the current state of transformations
    glTranslatef(-1.0f, 1.0f, 0.0f); //Move to the center of the triangle

    glBegin(GL_TRIANGLES);

    //Triangle
    glVertex3f(0.5f, -0.5f, 0.0f);
    glVertex3f(0.0f, 0.5f, 0.0f);
    glVertex3f(-0.5f, -0.5f, 0.0f);

    glEnd();

    glPopMatrix(); //Undo the move to the center of the triangle
Again, if we compile and run these changes, the program works the same.
There are two new and important functions used in this code: glPushMatrix() and glPopMatrix(). We use them to save and restore the state of our bird. glPushMatrix saves its state, and glPopMatrix restores it. Note that, like glBegin and glEnd, each call to glPushMatrix must have a corresponding call to glPopMatrix. We have to save the state of our bird using glPushMatrix in order to undo the move to the center of the shapes.
We can save more than one bird state at a time. In fact, we have a stack of saved states. Every time we call glPushMatrix, we add a state to the top of the stack, and every time we call glPopMatrix, we restore and remove the state at the top of the stack. The stack can store up to at least 32 different transformation states.
glPushMatrix and glPopMatrix are so named because OpenGL uses matrices to represent the state of our bird. For now, you don't have to worry about how exactly the matrices work.
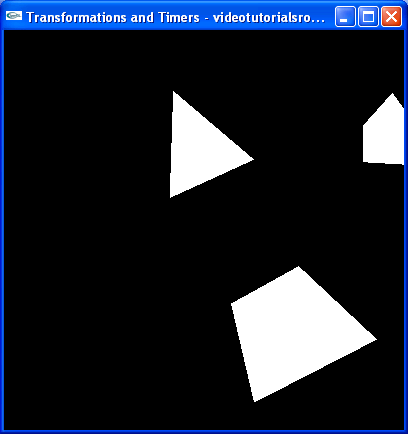
And now, we'll actually change what our program does. Let's make all of the shapes rotated by 30 degrees and shrink the pentagon to 70% of its original size.
float _angle = 30.0f;

//Draws the 3D scene
void drawScene() {
    glClear(GL_COLOR_BUFFER_BIT | GL_DEPTH_BUFFER_BIT);

    glMatrixMode(GL_MODELVIEW); //Switch to the drawing perspective
    glLoadIdentity(); //Reset the drawing perspective
    glTranslatef(0.0f, 0.0f, -5.0f); //Move forward 5 units

    glPushMatrix(); //Save the transformations performed thus far
    glTranslatef(0.0f, -1.0f, 0.0f); //Move to the center of the trapezoid
    glRotatef(_angle, 0.0f, 0.0f, 1.0f); //Rotate about the z-axis

    glBegin(GL_QUADS);

    //Trapezoid
    glVertex3f(-0.7f, -0.5f, 0.0f);
    glVertex3f(0.7f, -0.5f, 0.0f);
    glVertex3f(0.4f, 0.5f, 0.0f);
    glVertex3f(-0.4f, 0.5f, 0.0f);

    glEnd();

    glPopMatrix(); //Undo the move to the center of the trapezoid
    glPushMatrix(); //Save the current state of transformations
    glTranslatef(1.0f, 1.0f, 0.0f); //Move to the center of the pentagon
    glRotatef(_angle, 0.0f, 1.0f, 0.0f); //Rotate about the y-axis
    glScalef(0.7f, 0.7f, 0.7f); //Scale by 0.7 in the x, y, and z directions

    glBegin(GL_TRIANGLES);

    //Pentagon
    glVertex3f(-0.5f, -0.5f, 0.0f);
    glVertex3f(0.5f, -0.5f, 0.0f);
    glVertex3f(-0.5f, 0.0f, 0.0f);

    glVertex3f(-0.5f, 0.0f, 0.0f);
    glVertex3f(0.5f, -0.5f, 0.0f);
    glVertex3f(0.5f, 0.0f, 0.0f);

    glVertex3f(-0.5f, 0.0f, 0.0f);
    glVertex3f(0.5f, 0.0f, 0.0f);
    glVertex3f(0.0f, 0.5f, 0.0f);

    glEnd();

    glPopMatrix(); //Undo the move to the center of the pentagon
    glPushMatrix(); //Save the current state of transformations
    glTranslatef(-1.0f, 1.0f, 0.0f); //Move to the center of the triangle
    glRotatef(_angle, 1.0f, 2.0f, 3.0f); //Rotate about the the vector (1, 2, 3)

    glBegin(GL_TRIANGLES);

    //Triangle
    glVertex3f(0.5f, -0.5f, 0.0f);
    glVertex3f(0.0f, 0.5f, 0.0f);
    glVertex3f(-0.5f, -0.5f, 0.0f);

    glEnd();

    glPopMatrix(); //Undo the move to the center of the triangle
Now, our program looks like this:
We introduced a new variable, _angle, which stores the number of degrees by which we want to rotate our shapes. We also use two new functions. We call glRotatef, which rotates our bird. Our call to glRotatef(_angle, 0.0f, 0.0f, 1.0f) rotates our bird by _angle degrees about the z-axis, while our call to glRotatef(_angle, 1.0f, 2.0f, 3.0f) rotates our bird by _angle degrees about the vector (1, 2, 3). We also call glScalef(0.7f, 0.7f, 0.7f), which shrinks our bird to 70% of its original size in the x, y, and z directions. If we were to call glScalef(2.0f, 1.0f, 1.0f) instead, we would double its size in the horizontal direction, according to its perspective.
It is important to note that glTranslatef, glRotatef, and glScalef, may not be called in a glBegin-glEnd block.
Now, let's change the camera angle so that we look 10 degrees to the left.
float _cameraAngle = 10.0f;

//Draws the 3D scene
void drawScene() {
    glClear(GL_COLOR_BUFFER_BIT | GL_DEPTH_BUFFER_BIT);

    glMatrixMode(GL_MODELVIEW); //Switch to the drawing perspective
    glLoadIdentity(); //Reset the drawing perspective
    glRotatef(-_cameraAngle, 0.0f, 1.0f, 0.0f); //Rotate the camera
    glTranslatef(0.0f, 0.0f, -5.0f); //Move forward 5 units
Our program looks like this:
Observe that we use a special trick to change the camera angle. We just rotated the entire scene by 10 degrees in the opposite direction. This is a useful technique that you'll use a lot in 3D programming.
Before we move on to timers, I'd like to explain glMatrixMode. If we call glMatrixMode(GL_MODEL_VIEW), we switch to setting transformations for the points in the scene. If we call glMatrixMode(GL_PROJECTION), like we did in handleResize, we switch to setting a special transformation that is applied to our points in addition to the normal transformations. Take a look at handleResize. We switched to the projection matrix mode, called glLoadIdentity() to reset all of its transformation and called gluPerspective. gluPerspective performs a weird transformation that gives our points "perspective". Don't worry about how exactly it works. You just have to know that we use GL_PROJECTION to set up our perspective and GL_MODEL_VIEW for everything else.
GL_PROJECTION is sometimes described as the transformation for the camera, but this isn't exactly accurate, because light sources aren't affected by the transformations in "projection" mode. It's a bad idea to use it for setting the camera.
Now that we changed the camera angle, it's harder to see everything, so let's just change _cameraAngle to 0.
Timers
And now, let's add some motion using GLUT timers. The basic idea behind timers is that we want some piece of code to execute every so often. In this case, let's rotate the shapes by 2 degrees every 25 milliseconds. Here's how we do it.
void update(int value) {
    _angle += 2.0f;
    if (_angle > 360) {
        _angle -= 360;
    }

    glutPostRedisplay(); //Tell GLUT that the scene has changed

    //Tell GLUT to call update again in 25 milliseconds
    glutTimerFunc(25, update, 0);
}
Here's our update function. First, we increase the angle by 2. If it gets above 360 degrees, we subtract 360, which doesn't change the angle that the variable indicates. We don't actually have to do that, but it's better to keep angles small, because of issues related to float precision. I won't really go into detail about that here. Then, we call glutPostRedisplay(), which tells GLUT that the scene has changed and makes sure that that GLUT redraws it. Finally, we call glutTimerFunc(25, update, 0), which tells GLUT to call update again in 25 milliseconds.
The value parameter is something that GLUT passes to our update function. It is the same as the last parameter we passed to glutTimerFunc for that function, so it will always be 0. We don't need to use the parameter, so we just ignore it.
glutTimerFunc(25, update, 0); //Add a timerWe add another call to glutTimerFunc to our main function, so that GLUT calls it for the first time 25 milliseconds after the program starts.
That's it. Give the program a go. Download the source code, compile the program, and run it. Marvel at our accomplishment; we now have rotating shapes.
Next is "Lesson 3: Color".
- Summary
- *
- Text version
- *
- Exercises
- *
- Download source