Lesson 5: Textures
- Summary
- *
- Text version
- *
- Exercises
- *
- Download source
What Are Textures, and Why Do We Use Them?
A lot of the time, we'll want to put pictures, or "textures", on our 3D polygons, instead of just color. There are two main reasons for this. The first one is more obvious; we might want to give the shape some detailed appearance. For example, it's much easier to make a person's face if we take a picture of a face and apply the texture to a few polygons in the face, than if we have a million tiny colored faces. The second reason is that we might want to approximate the lit appearance of some small feature, without adding tons of polygons. For example, using textures, we can make a golf ball look like it has dimples, as in the below picture:
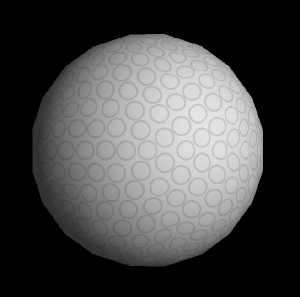
Okay, so it looks a little cruddy, but it gives you the idea. The above picture has relatively few polygons, as you can observe if you look at its outline. It gives the appearance of having dimples by applying textures to its faces. Rather than using textures, we could just add tons of polygons to the figure, but there this would slow down drawing, and it would be a lot of work to figure out the extra points and faces that we want to add. This technique is indispensible to computer graphics, and is especially visible on PlayStation 1 and Nintendo 64 games.
The downside to using textures to simulate small features is that it doesn't respond correctly to lighting. For example, if we shine light nearly parallel to a given face on the golf ball, one side of the dimple should be light and the other should be dark, but this won't happen if we're using textures. Still, it's better than nothing, and it has the advantages I mentioned over adding extra polygons.
Textures in OpenGL
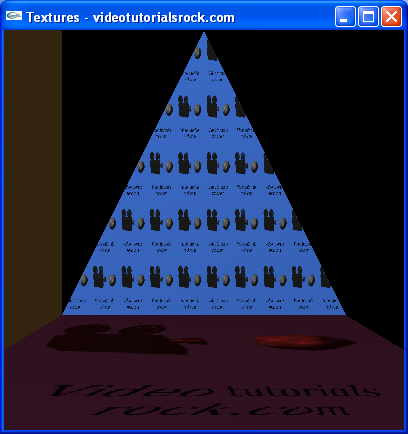
Let's get down to some code. First, take a look at what our finished program will look like.
To make a figure like this, the first thing we have to do is load an image with the texture we want. We want to take a picture file and get it into an array of characters (R1, G1, B1, R2, G2, B2, ...) indicating the color of each pixel in the image. Each component ranges from 0 to 255. Our array will start with the lower-left pixel, then progress to the right end of the row, then move upward to the next column, and so on. This is the format in which OpenGL likes our images.
I've written a loadBMP function to load bitmap images for us. Bitmaps take up a lot of space compared to image formats, like .PNG, but I chose to use bitmaps because they are relatively easy to load into format that we need. The loadBMP function isn't all that long or complicated (other than the memory management stuff I'm doing to make sure that the program doesn't leak memory). I made it using information about the bitmap file format on Wikipedia. At any rate, you don't have to know how it works; all you have to know is what it does.
Take a look at imageloader.h. This gives us the basic idea of what loadBMP does. (The actual code for loadBMP is in imageloader.cpp.) Given a filename, it returns an Image object, which contains the width and height of the image, as well as the array pixels, which stores the pixels' colors in the format we want.
Once we've got the image, we have to send it to OpenGL. We do this in a function we write called loadTexture.
//Makes the image into a texture, and returns the id of the texture
GLuint loadTexture(Image *image) {
Our loadTexture function takes an Image object and returns a GLuint (which is kind of like an unsigned int) giving the id that OpenGL assigned to the texture.
    GLuint textureId;
    glGenTextures(1, &textureId); //Make room for our texture
First, we tell OpenGL to make room for the texture, by calling glGenTextures. The first argument is the number of textures we need, and the second is an array where OpenGL will store the id's of the textures. In this case, the second argument is an "array" of size 1. By C++ magic, using &textureId as the second argument will result in having textureId store the id of our one texture.
    glBindTexture(GL_TEXTURE_2D, textureId); //Tell OpenGL which texture to edit
    //Map the image to the texture
    glTexImage2D(GL_TEXTURE_2D,                //Always GL_TEXTURE_2D
                 0,                            //0 for now
                 GL_RGB,                       //Format OpenGL uses for image
                 image->width, image->height,  //Width and height
                 0,                            //The border of the image
                 GL_RGB, //GL_RGB, because pixels are stored in RGB format
                 GL_UNSIGNED_BYTE, //GL_UNSIGNED_BYTE, because pixels are stored
                                   //as unsigned numbers
                 image->pixels);               //The actual pixel data
Now, we have to assign the texture id to our image data. We call glBindTexture(GL_TEXTURE_2D, textureId) to let OpenGL know that we want to work with the texture we just created. Then, we call glTexImage2D to load the image into OpenGL. The comments explicate what each of the arguments is, although you don't really need to understand all of them. OpenGL will copy our pixel data, so after this call, we can free the memory used by the image using delete. (We don't do this here; we do it elsewhere in main.cpp.)
Note that we should only use images whose widths and heights are 64, 128, or 256, since computers like powers of 2. Other sizes of images might not work properly.
    return textureId; //Returns the id of the texture
}
Last, but not least, we return the id of the texture.
We want to load the file "vtr.bmp" as an image and make it into an OpenGL texture, so we add the following to initRendering:
    Image* image = loadBMP("vtr.bmp");
    _textureId = loadTexture(image);
    delete image;
It's pretty straightforward. We load the image, then load the texture into OpenGL, then delete the Image object, since we don't need it any more.
On to drawScene. We start by calling glEnable(GL_TEXTURE_2D) to enable applying textures and glBindTexture(GL_TEXTURE_2D, _textureId) to tell OpenGL that we want to use the texture with id _textureId.
Now, we have to set up how we want OpenGL to map our texture. To understand what this means, we have to know a little more about texture mapping.
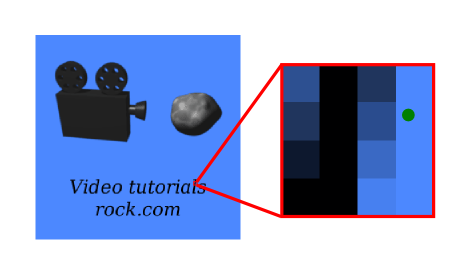
Each pixel that we draw for a textured polygon corresponds to a point on our image. For example, it might correspond to the green point in the above picture. OpenGL has to figure out what color to make the pixel. The most straightforward approach is to take the color of the nearest texel (texture pixel), light blue in this case. But this makes our texture look blocky, like in the bottom face of the screenshot of our program. You may have seen blocky textures in games when you got really close to a wall or other object; they use this type of mapiping. A better idea is to average the colors of the texels surrounding the point. In the example, we would take a weighted average of the light blue texel on which the point lies along along with the one above it, the one to its left, and the one above it and to its left. Using this method makes the image look blurry instead of blocky, which is usually better. In general, there's little reason to use the blocky mapping, in my opinion.
Just for kicks, we use the blocky mapping style on the bottom face. To do this, we call glTexParameteri(GL_TEXTURE_2D, GL_TEXTURE_MIN_FILTER, GL_NEAREST) and glTexParameteri(GL_TEXTURE_2D, GL_TEXTURE_MAG_FILTER, GL_NEAREST). The first call tells OpenGL to use the blocky mapping (GL_NEAREST) when the texture is far away from us, and the second call tells it to use blocky mapping when the texture is close. If we wanted to use blurry mapping, we'd pass GL_LINEAR as the third parameter of these two functions. If you want to see what the program looks like when it uses the blurry mapping, comment these two lines out and uncomment the two lines beneath it.
Now, we call glColor3f(1.0f, 0.2f, 0.2f) to apply a color to our texture. The call makes the image look reddish. Why are we doing this? Beats me. I just wanted to show you that you can do it. The call tells OpenGL to multiply the green and blue components of the image by 0.2. If we didn't want to color the image, we'd call glColor3f(1.0f, 1.0f, 1.0f) instead. By the way, you can even apply color blending to a texture.
    glBegin(GL_QUADS);

    glNormal3f(0.0, 1.0f, 0.0f);
    glTexCoord2f(0.0f, 0.0f);
    glVertex3f(-2.5f, -2.5f, 2.5f);
    glTexCoord2f(1.0f, 0.0f);
    glVertex3f(2.5f, -2.5f, 2.5f);
    glTexCoord2f(1.0f, 1.0f);
    glVertex3f(2.5f, -2.5f, -2.5f);
    glTexCoord2f(0.0f, 1.0f);
    glVertex3f(-2.5f, -2.5f, -2.5f);

    glEnd();
Now, in addition to a normal vector, each vertex has a texture coordinate. The texture coordinates indicates to what point on the image each vertex maps. The texture coordinate (a + b, c + d), where a and c are integers, indicates the spot that is the fractional amount b above the bottom of the texture and the fractional amount d right of the left of the texture. To specify the texture coordinates of a vertex, we simply call glTexCoord2f with the texture coordinates we want before calling glVertex3f for the vertex.
    //Back
    glTexParameteri(GL_TEXTURE_2D, GL_TEXTURE_MIN_FILTER, GL_LINEAR);
    glTexParameteri(GL_TEXTURE_2D, GL_TEXTURE_MAG_FILTER, GL_LINEAR);
    glColor3f(1.0f, 1.0f, 1.0f);
For the face in the back, we want to use blurry texture mapping, so we call glTexParameteri with GL_LINEAR as the last argument. Then, we call glColor3f(1.0f, 1.0f, 1.0f) so that the image doesn't have any kind of coloring. Note that we don't have to call glBindTexture again to set the texture; OpenGL just stays with the same texture.
    glBegin(GL_TRIANGLES);

    glNormal3f(0.0f, 0.0f, 1.0f);
    glTexCoord2f(0.0f, 0.0f);
    glVertex3f(-2.5f, -2.5f, -2.5f);
    glTexCoord2f(5.0f, 5.0f);
    glVertex3f(0.0f, 2.5f, -2.5f);
    glTexCoord2f(10.0f, 0.0f);
    glVertex3f(2.5f, -2.5f, -2.5f);

    glEnd();
We specify the normal, texture coordinates, and vertices of the triangle in the back. Notice that the way we have the texture coordinates set up, our image will be repeated and squished over the face of the triangle, as in the screenshot of our program.
    //Left
    glDisable(GL_TEXTURE_2D);
    glColor3f(1.0f, 0.7f, 0.3f);
    glBegin(GL_QUADS);

    glNormal3f(1.0f, 0.0f, 0.0f);
    glVertex3f(-2.5f, -2.5f, 2.5f);
    glVertex3f(-2.5f, -2.5f, -2.5f);
    glVertex3f(-2.5f, 2.5f, -2.5f);
    glVertex3f(-2.5f, 2.5f, 2.5f);

    glEnd();
Now, we want to switch back to using colors instead of textures, so we call glDisable(GL_TEXTURE_2D) to disable textures and then make a colored face like in previous lessons.
And that's the way textures work in OpenGL.
Next is "Lesson 6: Putting It All Together".
- Summary
- *
- Text version
- *
- Exercises
- *
- Download source